Monday, November 26, 2012

"SOAP message cannot be parsed" error message in SharePoint 2010 InfoPath

Scenario:

We had a SharePoint list with 50 columns and list contains 3000+ items. The list grew over period of time, and of course list views set-up in a way that total number of items in a view does not exceed the threshold. We we tried to change the InfoPath and re-publish it, got the following error, but when I delete 3000 items from the same list and try to publish the InfoPath, the updates goes through smoothly. 


Solution:

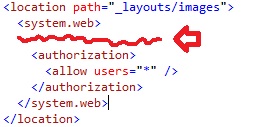
It looks like when we re-publish the InfoPath, SharePoint trying to update each item's property behind the scene and this operations times-out for List contains larger number of Items. So override the httpruntime executionTimeout from the default value. I tried with 3000 seconds and the update went through successfully.


Wednesday, November 21, 2012

SharePoint EventViwer Errors and its Solutions


Error 1:

Error Text: 

Load control template file /_controltemplates/TaxonomyPicker.ascx failed: Could not load type 'Microsoft.SharePoint.Portal.WebControls.TaxonomyPicker' from assembly 'Microsoft.SharePoint.Portal, Version=14.0.0.0, Culture=neutral, PublicKeyToken=71e9bce111e9429c'.

Reason:

The ULS log is created in a code path where all control templates are loaded into the web application. This is a onetime process which happens just before showing any UI to the user after an IISReset. The source of the problem looks like a stale control template in the control templates folder while the control itself has been removed from the code base.

Fix:
  • Navigate to /14/TEMPLATE/ControlTemplates/TaxonomyPicker.ascx user control
  • Open the user control in a text editor and locate the first line
  • Find the character string , and replace with a comma ‘,’ (without quotes).
  • Find the character string " and replace with a single quote ‘.
  • Save the user control

**If above fix does not resolve the error, then rename the TaxonomyPicker.ascx user control to TaxonomyPicker.ascx_broken as SharePoint 2010 does not use this control.

Error 2:

Error Text: 

Object Cache: The super user account utilized by the cache is not configured. This can increase the number of cache misses, which causes the page requests to consume unnecessary system resources. To configure the account use the following command 'stsadm -o setproperty -propertyname portalsuperuseraccount -propertyvalue account -url webappurl'. The account should be any account that has Full Control access to the SharePoint databases but is not an application pool account.

Additional Data:
Current default super user account: SHAREPOINT\system

Reason:

The issue occurs if we fail to configure object caching properly. Object caching helps SharePoint to efficiently retrieve cached versions of items where possible. SharePoint cannot perform optimally without this being done.

Fix:
  • create 2 domain users – superreader (Read permissions) and superuser (account that has Full Control access to the SharePoint databases but is not an application pool account)
  • Then run a small power shell command to add these super reader and super user to the desired web applications.
$wa = Get-SPWebApplication http://< server >/
$wa.Properties["portalsuperuseraccount"] = “domain\superuser”
$wa.Properties["portalsuperreaderaccount"] = “domain\superreader”
$wa.Update()
 
Error 3:


Error Text: 

The SharePoint Health Analyzer detected an error.  Drives are running out of free space.
Available drive space is less than twice the value of physical memory. This is dangerous because it does not provide enough room for a full memory dump with continued operation. 

Reason: 

This error (warning) is more for production environments. Its a calculation based on the size of the drive and the available free space. So on a Dev VM you will nearly always see this error. Nothing to worry about. That said I would still keep an error on the available disk space and the total size of the ULS log files.

Wednesday, November 7, 2012

SHAREPOINT 2013 UPGRADE PROCESS

This model describes the required steps to upgrade from SharePoint Foundation 2010 or SharePoint Server 2010 to SharePoint Foundation 2013 or SharePoint Server 2013. The database-attach method is the only supported method for upgrading from SharePoint 2010 Products to SharePoint 2013 Products. Information about the Business Data Connectivity service application applies to both SharePoint Server 2013 and SharePoint Foundation 2013. Information about all other service applications and about My Sites applies only to SharePoint Server 2013.

Prepration to upgarde sharepoint 2013

prepare 2013 farm

sharepoint 2013 upgardation

upgarde services from sharepoint 2010 to sharepoint 2013

upgarde sites in sharepoint 2013

sharepoint 2013


I am planning to provide you video tutorial for sharepoint 2010 to sharepoint 2013 upgardation in near future. stay tuned.

For information about 2tier to 3tier migration Please visit : http://sharepointshah.blogspot.in/2012/06/scale-out-sharepoint-2010-farm-from-two.html


Monday, October 29, 2012

Backup and Restore a List or Document Library

How to Backup and Restore a List or Document Library? Well its an easy job. not to have worry.

There are two methods available for Exporting List or library from the sitecollection.
1) GUI based.
2) Power shell command based.

For Importing List there is only one method available and that is Power Shell.

Export List

1) GUI Based:

You can use the central admin to do granular backup jobs but PowerShell gives you a level of control and flexibility that you can’t find in the GUI.
It is an easiest method for taking backup/Export of List. Go to Cerntral Admin >> Backup and Restore 

Backup and Restore in Sharepoint 2010
 select Export a site or list. Now select options appropriately.


site collection export
After successfull filling all the details you will be redirected to Job Status page. set back and relax till Sharepoint exports lists to the specified folder. after completion small summary will be look like this :


Granular Backup Job Status in Sharepoint 2010


2) Power Shell Command Based:

The list in this case of interest is the ‘car’ list.


Export-SPWeb "http://www.domain.com/" -itemurl "/Lists/car" -path "E:\car.cmp"

Please note the trailing slash on the URL. 
you can find more option on Microsoft technet article on Export-SPWeb

Import List

For Importing List, there is only one method avaialble and that is Power Shell.

Now if we deleted the list by mistake the import command is as follows.


Import-SPWeb "http://www.domain.com/" -Path "E:\car.cmp"
 
There are various flags that can be added like ‘-force’ or ‘-UpdateVersions’. If you need more information take a look at the associated TechNet Articles on Import-SPWeb

**Note this assumes you have administrative level access to PowerShell on the farm.
 Hope this Helps.

Regards,
Viral Shah 

Tuesday, October 23, 2012

Web Application Ribbon Menu Images Not Found

At some Day we all had faced strange scenarios in SharePoint 2010.  Strange means we are not able to find solution on internet. Yesterday I faced similar kind of situation in SharePoint 2010. I am not doubting the ability of sharepoint 2010, but this issue is related to change in webconfig manually.!!


Webapplication menu images not appering
Did you faced any issue related to SharePoint 2010 web application or site collection menu images disappears suddenly? It looks like this.

I am sure after checking this kind of error your blood presser is going to high..!

I spent several hours searching it over the internet but not able to find any clue. This error comes on particular web application on the server farm and not on whole servers web applications.

After researching in web config file, i found this error comes because of the web.config portion of the particular website was tempered by some developer..!


you can find web.config file for particular webapplication in C:\inetpub\wwwroot\wss\VirtualDirectories\<<port number of webapplication>>\web.config


Find this section by simply finding Ctrl+F "images" in web.config.

Red arrow shows that some session code were entered between system.web and authorization portion.


This web.config section must look like this. because there was some code in this section, IIS was not able to read this web.config file correctly.


After re-correcting the code you will find that issue has been resolved. Images are not appearing in site action section of the web application. 

So Be Careful while working with sharepoint 2010 web application web.config file. 

Thanks and Regards,
Viral Shah


Wednesday, October 17, 2012

Create an SSL / HTTPS Site in SharePoint 2010

Why HTTPS Requires?

HTTPS is the secured way of communication between server and client. Here the message is encrypted between client and server. An encryption mechanism is needed protect the message from being manipulated by unwanted parties.

HTTPS works by installing a certificate in the server side web application. This certificate is used to encrypt the messages between client and server.  The encryption is based on a public key and private key usage. The public key will be shared with client for encrypting the message and the decryption is performed on the server side using the private key. 

Note: Stealing the public key does not do any favor in decrypting the message using Man In the Middle attack as Public key can only be used for encryption.

Please Follow below mentioned steps in order to enable SSL in SharePoint 2010 site

Step 1: Create New Web Application
Go to Central Administration and open the Manage Web Applications link. Create a new Web Application with the following properties:
  1. Name as My Secured Site
  2. Use Secured Sockets Layer (SSL) Yes
Create New Web Application  


Enable SSL in Sharepoint 2010


Click the OK button to create the new web application.
Now add a new site collection inside the newly created web application.
Central Administration > Create Sitecollection > Choose current web application

Step 2: Set the Certificate
For SSL enabling you need to specify a Certificate in the Server which contains the public and private keys. Go to Internet Information Services (IIS / inetmgr.exe) and select the newly created site. Click on the Bindings link from the right side.


IIS in SharePoint 2010


In the appearing dialog select the https item and click the Edit button.


In the appearing dialog select the Certificate from drop down list.


Click the OK button to continue.

Step 3: Test the URL.
Now you are ready to test the HTTPS url.  Open a browser and enter the url of the web site. You can also you the Browse link from IIS.
You will get the page as shown below. It says the certificate is not trusted one. You can use the Continue link to proceed with.


https configured sharepoint site


Now you should be prompted with the site credentials. Enter the credentials to continue and you should get the site collection which you have created.


ssl site for sharepoint 2010


Hurray! If you can see the above site then you are done with your SSL enabled site in sharepoint 2010. Please note that the URL now starts with https.

Adding SSL (https) support to an existing web application

You can add SSL support to an existing web application by performing the following:
  1. Open IIS manager
  2. Select the web application
  3. Choose Bindings dialog
  4. Add new binding of type https
  5. Select the Certificate
  6. Click the OK button
 And Done!!
Regards,
Viral Shah

Wednesday, October 10, 2012

Use Visio Service in SharePoint 2010

Visio service in sharepoint is useful to see visio drawing and graphs in your browser only. But unless you have gone through the steps, it might not be all that obvious.

The requirements for this is that you must have both SharePoint 2010 Enterprise and Visio 2010.

Step 1 - Turn on Visio Services

Go to --> Site Actions --> Site Settings.
Then click "Manage site features".

visio feature in sharepoint 2010


If your SharePoint Server Enterprise Site features are not activated, click the Activate button.
Activate Visio in central admin of sharepoint 2010


Here is what it should look like:


Step 2 - Configuring the document library.

Now, navigate to a document library where you would like to publish the Visio for users to view in a web browser. Go to the List settings and click Advanced Settings.

my visio library settings

Set the Opening Documents in the Browser option to Open in the browser.
open visio files in browser

Step 3 - Publishing a Visio 2010 document

After creating your Visio document, select Save As from the File menu.


save visio document


In the File name box, paste the URL of the site where you library is.


Navigate to the library (double click).


Give your file the desired name.
IMPORTANT: From the Save as type: dropdown, choose Web Drawing. Then press Enter or click Save.


save visio in web drwaing format


Here's what the Visio looks like in a web browser.

visio 2010 open in web browser

 And Done..!! you have successfully configured Visio service in SharePoint 2010

Thursday, October 4, 2012

Set SSRS 2008 R2 (SQL Server Reporting Server 2008 R2) Subscriptions in SharePoint 2010

Reports can be pulled from the Report Manager by finding the report the user wants to have. The way to deliver reports at a specific time, in a specific format to the user is to use subscriptions. A subscription is a standing request to deliver a report at a specific time or in response to an event, and then to have that report presented in a way that you define. Subscriptions provide an alternative to running a report on demand. On-demand reporting requires that you actively select the report each time you want to view the report. In contrast, subscriptions can be used to schedule and then automate the delivery of a report.

Report subscriptions are processed on the Report Server. They reach end users through delivery extensions that are deployed on the Report Server. 


E-Mail Delivery in Reporting Services:

Reporting Services includes an e-mail delivery extension that provides a way to e-mail a report to individual users or groups. The e-mail delivery extension is configured through the Reporting Services Configuration Manager tool and by editing the Reporting Services configuration files.

Select the Email Settings--> Sender Address, Current SMTP Delivery Method and SMTP Server.


 The subscription option can be accessible in the Web Part for the Reporting Service "Actions > Subscribe", or accessing in the "Site Actions > Site Settings"

central administrator SSRS


This option will give you different options and Types of Reports you can use to store the report associated for the schedule Reports.

delivery extensions in ssrs and sharepoint 2010

The subscribe option also give you the ability to configure and schedule Tasks for the reports.


schedule ssrs in sharepoint 2010
 This page allows you to choose how you want to receive the report. By email is probably the simplest way (and is the default). The available options are;

  • Email (default): You can choose to have a report sent to any email address (for example a distribution list) but you should already remember that only the person who sets up the Subscription will be able to edit it and if they leave and their Active Directory (AD) account is disabled the subscription will automatically stop
  • Windows File Share: Select this to choose to have the report sent to a Windows File Share. You can specify your username and password to grant access. Useful under certain circumstances, but I'd recommend switching to a ...
  • SharePoint Document Library: We like this one. Again it requires some setting up by your system administrator but once it's there then you get all the nice features of SharePoint (sharing, versioning, security, etc) without the permission problems of Windows File Shares. This is our preferred option for in-house reporting
  • Null Delivery Provider: Sometimes it's necessary just to run the report without worrying about the results (triggering caching automatically for example). If that's the case then this is the provider to select.
Once you've picked the "Delivery Extension" (how you want the report delivered) then the next steps are to expand on that by selecting the following;

Output Format/ Report Contents/ Render Format (Depends on Delivery Extension selected): Here you can select the format you want the report to be saved in. You can (in Sharepoint 2007 with SQL SSRS 2008R2) only select a single format which means if you want the report in multiple formats (for example PDF for archiving, and Excel for working with) you need to create multiple schedules  


Render Format – If you have chosen to include the report, you can pick a format here. The formats you can pick from vary based on your version of Reporting Services.
XML file with report data – the user receives an .xml file as an attachment.
CSV (comma delimited) – the user receives a .csv file as an attachment.
• Acrobat (PDF) file – the user receives a .pdf file as an attachment.
MHTML (web archive) – the user receives the report embedded in the body of the email, rather than as an attachment. (I was really excited when I discovered this!)
Excel – the user receives an .xls file as an attachment.
TIFF file – the user receives a .tiff file as an attachment.
Word – the user receives a .doc file as an attachment. This is new in 2008.


  • Delivery Event: You can select either; a) When a report snapshot is created, b) On a shared schedule, or c) on a Custom Schedule. You need to decide when you want the report and whether it's important or not if it runs at the *exact* time specified or within a few minutes/ hours. If it absolutely has to run at a specific time then select Custom Schedule 
"Delivery Event" Subscription Options*
Parameters: Here you select the parameters for your report. Here you'll definitely need the help of the report writers who need to have written the report with scheduling in mind in order for it to work. For example if you have a report which has a Start and End Date then the default values need to be default to, for example, the start and end of last month so that when it's scheduled to run on the 1st of every month the user can just select "defaults" rather than having to hard-code values.
 Now that you've selected all the options click "OK" (at the top) to create the subscription.
and that's it. You are Done!!
Regards,
Viral Shah
 

Monday, September 17, 2012

PeoplePicker related issue in custom Layouts pages after SharePoint June 2011 CU


If you are using PeopleEditor AKA PeoplePicker in custom layout pages and have installed SharePoint 2010 SP1 and the June 2011 CU you may experience problems if your application page performs a postback.

If you have filled your people editor control with a value before a postback is triggered, it will stop functioning as an actual picker and if you perform another postback on the page you will get an errormessage: “String was not recognized as a valid Boolean”.

The reason seems to be that a lot of span tags are not regenerated after the first postback.
The only descent fix so far seems to be to validate the PeopleEditor control in the page OnLoad event:

protected override void OnLoad(EventArgs e)
{
    base.OnLoad(e);
    if (IsPostBack)
    {
        yourPeopleEditor.Validate();
    }
}

Contact me

Name

Email *

Message *

Total Pageviews